I have been making progress on the project in terms of Post-Production. This project is considerably quite extensive and require a lot of editing. And during the Post-Production Stage I have been encountering issues when trying to edit at college. For example, multiple computers will not allow me to open the Premiere Pro or after effect files due to insufficient permissions which doesn't make much sense. Other errors include Adobe unable to verify the subscription status and the last error being that because I started editing at home where I use the latest version of Adobe software where as the adobe software at college is outdated, I am unable to even open the project so as of now, I am limited to only editing at home. Although I have requested an extension on the deadline so I have more time to edit and gather feedback for the evaluation.
I have taken many screenshots which I will explain the process of editing each topic ranging from Manual Camera Settings to Interview and Dialogue scenes.
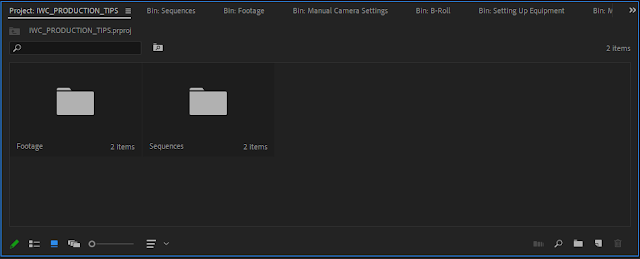
The first screenshot is the basic structurer of the bins in Premiere Pro. The bins split the Footage and Sequences into their own folders. The Footage folder have two separate folders containing the A-Roll footage and the B-Roll footage so that the footage is organised efficiently
This screenshot is importing all the footage into the timeline including the A-Roll and B-Roll. Using the EDL created for the Manual Camera Settings video I can import the useful footage that was needed for the project and leaving the footage that is not needed out of the project.
This screenshot is the creation of the Title Screen Sequences. I will be using After Effects to create the title screens because After Effects is a useful program in creating advanced graphics and contains useful tools such as 3D Objects, Motion tracking, Expression keyframes when making automatic animation and much more.
This screenshot is the background to the title screen. To make this, I created a straight line with the shape tool and added a Wiggle Path to the object so that the line would wiggle. I then added a repeater so that the line would duplicate in one source instead of duplicated it into multiple sources and hindering performance. I then added 3D properties to the source so that I could change the perspective of the source instead of looking 2D for visual appeal
This screenshot is creating a basic animation for the title reveal aspect of the title screen. Using the Graph editor, I could change the speed of the keyframes to fit the speed I want to achieve.
This screenshot is final edit for the Title Reveal. To achieve this, I added a mask to the Text and animated it to track the white background for the text, revealing the text as the white background revealed itself.
This screenshot is animating the introduction to the title screen. Animating the change of the shape to reveal it and then animating it to move around the shot.
This screenshot is the making of the backdrop for the greenscreen. My idea for this was to make multiple shapes move around the shot slowly as well as having their own drop shadow. In order to make the shapes move, I needed to make keyframes of their movements. But using keyframes that change their movements every few frames would be insufficient. So instead of making manual keyframes, I decided to use Keyframe Expressions to make automatic animations to the shapes position and rotation.
The expression I used was wiggle(.1,100)
The wiggle expression makes random movements of the object using the values in the wiggle expression. The first number (1) means how many times the object will wiggle each second and the second number (100) means the intensity of the movement. The values I used was perfect as the objects moved slowly and did not move too far from their original position.
This screenshot is the final of the animated backdrop. I created multiple pre-composites of the object and changed their expressions slightly so they would not use the same movements as the other objects, making their movements unique and not at any point similar to the other objects,
This is the render screenshot for the backdrop. There was an issue with rendering this project and it was to do with the fact that the render engine would render each composite one by one which makes the render time too excessive. To reduce the render time, I would have to take them all out of their separate compositions. This reduced the render time from 2 hours to 30 minutes.
This screenshot is adding the Ultra Key effect to the A-Roll to remove the Green from the footage. I used the alpha channel of the footage so that I could efficiently remove the green from the shot. The alpha channel will show what the effect removes and what it keeps. Anything that is white in the shot means that will be in the shot and anything in black is removed by the Ultra Key.
This screenshot is the rough Idea for the Demonstration backdrop. I used a green source to map out where I wanted the Demonstration video to go.
This screenshot is the test for the demonstration backdrop. I wanted to make sure that the Demonstration video placeholder would not stretch the footage and make the footage distorted.
This screenshot is the creation of the Demonstration video backdrop. The video uses the same techniques as the Greenscreen backdrop, using expression keyframes to create random movements.
This is the final result for the demonstration video backdrop. I added a gaussian blur and vignette to the footage for visual appeal.
This shot is the basic idea for the introduction to the Manual Camera Settings.
This screenshot is using labels in the Timeline to organise all the clips. Each colour will represent what topic that clip is about.
This screenshot is the final result to introducing the Manual Camera Settings. Using masks and animated keyframes to move sources.
This shot is using graphics to explain the voiceover sentences. I used opacity keyframes to make the icons fade in when the setting was said in the voiceover
This screenshot is using After Effects to track the movement of the camera in order to apply the movement to a source
This screenshot is importing the After Effects composition into Premiere instead of rendering the After Effects composition, which can help reduce the file size of the folder.
This screenshot is the composition shot to Aperture. Using masks to split half the video to both clips and adding them to one shot.
This screenshot is repositioning the icons inside the safe margins. As all the shots are in a Nested composition, I didn't need to reanimate the icons individually.
This is the final result to the comparison shot for aperture, adding the animated backdrop behind it.
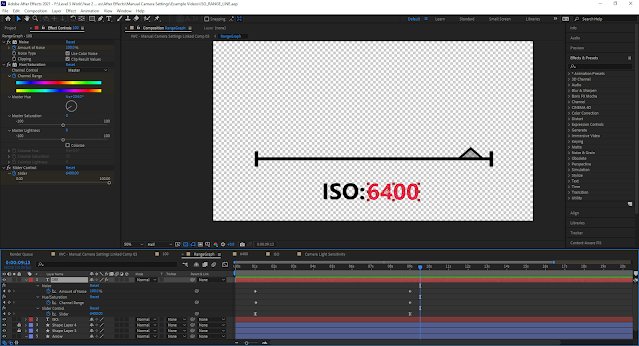
This screenshot is the composition to ISO information. I used shapes to add a slider effect as well as added a slider controller to the text which can be used to animate the text, increasing the number as the slider goes increases.
This screenshot is changing the colour of the text and adding noise as the slider goes up, to emphasise the meaning of the voiceover explaining that as the ISO is higher, the more noise it creates.
This is the final result of the ISO demonstration screen. I added footage to visually aid the ISO voiceover and the slider. As the arrow moves towards 6400, noise gradually appears on the footage to simulate a high ISO.
This screenshot is including the ISO information shot into Premiere Pro project.
This screenshot is using the slider controls to animate a increasing number for the Shutter Speed
This screenshot is the information screen for shutter speed, using the motion blur filter to the slow shutter speed example to illustrate a slow shutter speed
This is the Shutter Speed example. Using footage that uses different shutter speeds to show the effect of shutter speed and what it does to a moving object
This is the finished timeline for the Manual Camera Settings
This screenshot is the after effects composition of How to setup the Canon DSLR camera screen. The white and black background would then slide out of frame to reveal the next set of information. I had to render this with the RGB colours AND the alpha so that the video would render a transparent background
This is the composition shot of the white squares on the camera and lens to show how to attach the lens to the camera
This screenshot is the after effects composition for the white squares. I used trackers to track the motion of the footage then used a Trim path to animate the squares
This shot is the after effects composition that shows the camera mount and tripod mount. This effect is just like the screenshot above. They use trackers to track the motion of an object and added a shape that tracks the movement of the object and reveals itself with a trim path
This screenshot is the animated scene for demonstrating the 180 Degree rule
This screenshot shows how I setup the camera to show the shots used in dialogue/interview scenes. OTS shots and Coverage shots of the two characters
This screenshot shows the animation path for the MS to Overhead camera. This camera will show the 180 Degree line in post when the camera has reached the end of its animation


Comments
Post a Comment